Wooden chicken coop floor
Gentle coop wisdom
Wooden chicken coop floor: where your hens rest, scratch and feel safe
For my flock, the floor of the coop has always mattered more than the roof. It is where feet land, where dust baths start, and where the night feels either cozy or stressful.
On this page I want to walk you through how I think about a wooden chicken coop floor after many years with muddy springs, cold winters and a few silly mistakes. I will keep it simple and honest, like talking over the fence with a neighbor.
If you already know you want a wooden coop with a solid, easy-to-clean floor, you can look at ready-made models that match the ideas I share here.
Let me see options
Why the wooden chicken coop floor matters so much
Over the years I have found that many people look first at the roof, the windows, even the cute nesting boxes. The floor comes last. But my hens have taught me that the wooden chicken coop floor is the real foundation of their comfort and health.
When the floor is dry, firm and easy to clean, the whole coop smells better. The birds breathe easier. Their feet stay strong. When the floor is damp or drafty, you can feel the flock getting restless and noisy. I have seen it over and over again, especially during wet weather.
I still remember my first winter with a cheap coop on bare ground. The straw turned into a wet cake, and even when I changed it, the soil underneath stayed cold and clammy. The hens would huddle in a tight group, instead of spreading out to sleep. That was when I promised myself that the floor would never again be an afterthought.
So, when you look at any wooden chicken coop, try to imagine you are a hen, stepping in with bare feet. Is it dry? Is it smooth, but not slippery? Is it high enough from the ground? That simple change of view has helped me choose and build better homes for my birds.
Key qualities of a good wooden chicken coop floor
A wooden chicken coop floor can be wonderful if it respects a few simple rules. Over time, I have boiled them down to four main qualities that I always check, whether I am building something myself or looking at a ready-made coop.
- Dryness: the floor should stay dry even after long rain, with no water pooling in corners.
- Warmth: wood should not sit directly on wet ground; some space helps keep it warmer and less humid.
- Cleanability: old litter should come out in a few minutes, not turn into a battle.
- Durability: wood must be protected from droppings, moisture and gnawing, or it will rot and smell.
These four points sound simple, but each one has cost me at least one big mistake. My hens have been patient teachers. Let me share some of those lessons so you do not have to learn them the hard way as I did.
Soft tip: when you check a wooden chicken coop floor for the first time, kneel down and press your hand on the corners. If it feels cool and damp there, it will feel much worse after a rainy week.
Raised wooden chicken coop floor vs floor on the ground
One of the most important choices for a wooden chicken coop floor is whether it is raised above the ground or resting almost directly on it. I have lived with both setups, and my birds have clearly told me what they prefer.
Raised wooden floor: what my hens liked
The first time I moved my flock into a coop with a raised wooden floor, I felt the difference right away. The air inside was drier. The litter stayed fluffy longer. Even on frosty mornings, the floor felt less harsh.
- Better air flow under the coop: this keeps wood drier and slows down rot.
- Less chance of rats nesting under the floor: if the space is open and visible, it is easier to keep pests away.
- Warmer sleeping area in winter: the floor does not draw cold straight from the soil.
- Easier to level: the coop can sit on blocks or legs even if the ground is not perfectly flat.
My older hens especially liked to rest under the raised floor on hot summer afternoons. The shade and the cooler earth made a small, calm place where they could dust bathe and nap without being bothered.
Floor almost on ground: what went wrong for me
I once had a coop with a very low wooden chicken coop floor, only a few centimeters above the ground. It looked fine on a sunny day. But the first spring rain told me the truth. Water seeped underneath, and the floor slowly soaked it up like a sponge.
The bedding became heavy and damp, and the smell changed. It was not just “chicken coop smell”; it had that sweet, rotten note that makes you worry. I found dark spots forming in the corners, and the hens avoided those areas when scratching.
That experience taught me that, unless you live on dry, sandy ground, a floor that almost touches the soil is asking for trouble. If you cannot have a raised floor, at least add a good barrier between soil and wood, like a layer of gravel and a strong plastic or concrete pad.
Choosing the right material for your wooden chicken coop floor
Even when we say “wooden chicken coop floor”, there are different kinds of wood and ways to protect it. I am not a carpenter by trade, but many weekends with a saw in hand have taught me what tends to last under chickens and what fails too fast.
Boards, plywood, and coatings
The three most common setups I have used or seen in wooden coops are:
- Solid boards laid side by side, often tongue-and-groove.
- Plywood sheets cut to size and screwed down as one big panel.
- Wood plus a top layer like vinyl, rubber, or a removable tray.
Plain boards feel very natural and “farm like”, but if they are not well fitted, small gaps collect droppings and mites. Plywood gives a smoother surface, but it needs protection from moisture, or it will bubble and peel at the edges.
These days, for most backyard keepers, I tend to recommend a simple wooden floor that is then covered with something that makes cleaning easier, like a removable tray or a sturdy liner. That way the wood carries the weight and gives structure, while the liner takes the daily abuse from droppings and scrapes.
A small story from my coop: On one coop I painted the bare plywood floor with a thick outdoor paint and felt very proud. It looked beautiful for a few months. Then small scratches from shoveling bedding exposed the wood. Moisture crept in, and the paint started to chip like old bark. My hens did not complain, but I could see the floor aging faster than it should. Since then I still like paint, but I treat it as a base layer, not the only protection.
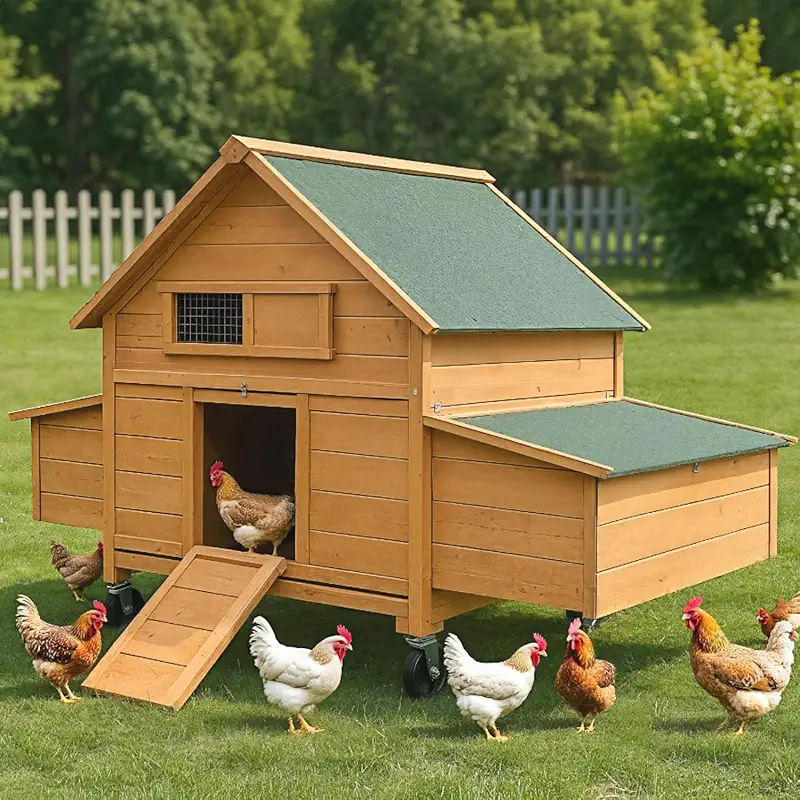
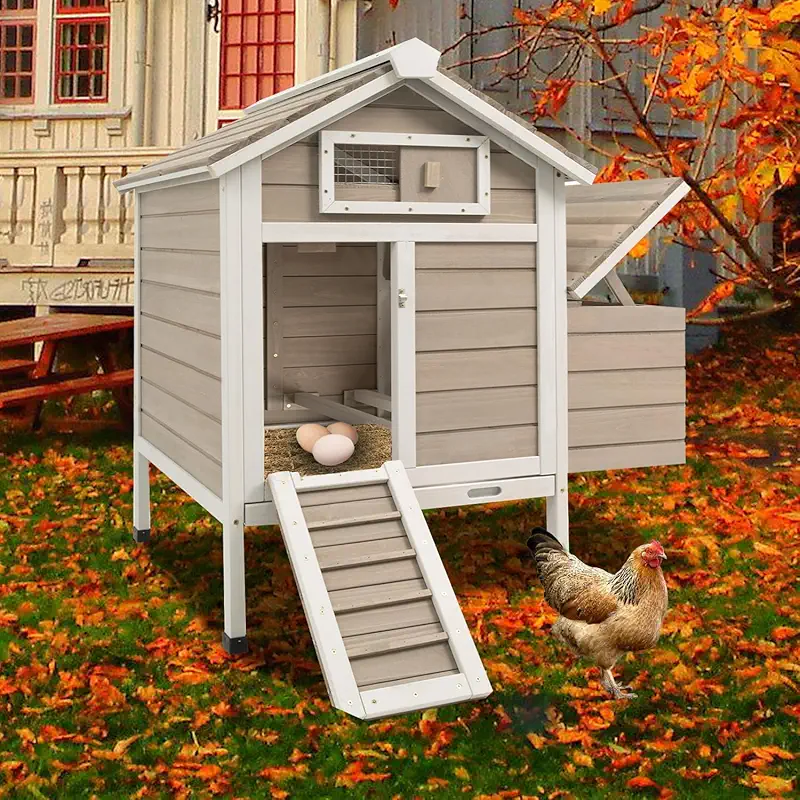
Compact coop with lined wooden floor
Good for a small flock in a backyard where space is tight. The lined floor helps cleaning days feel less heavy.
Comfort focus • small flock
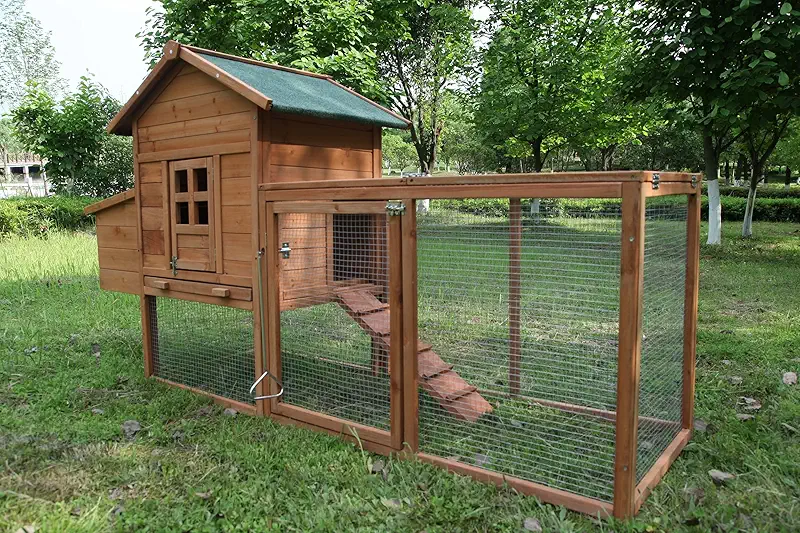
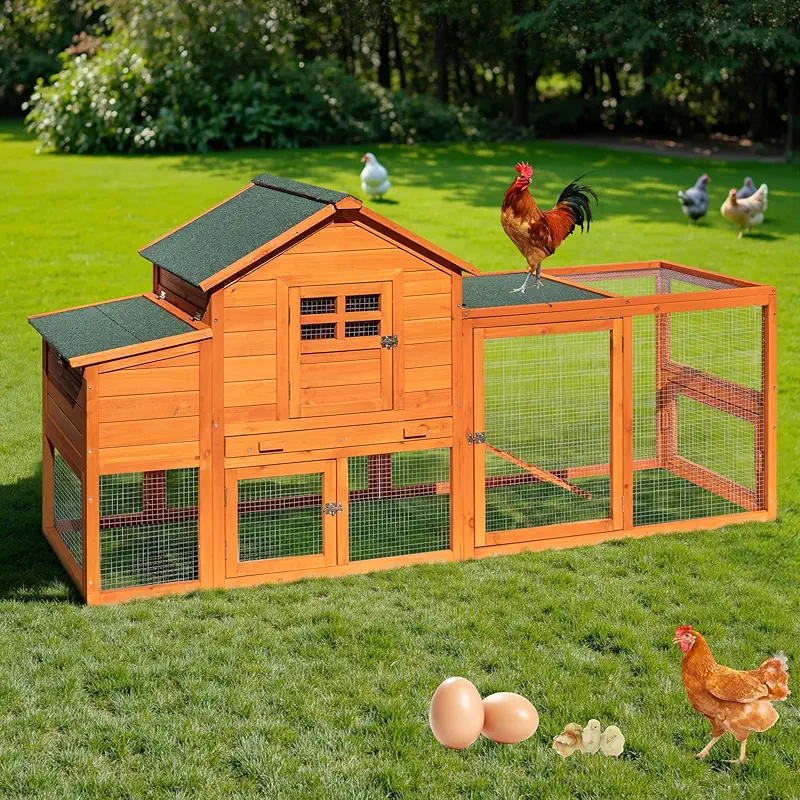
Raised wooden coop for wet yards
Higher from the ground, kinder to feet and feathers in rainy climates. Easy access to check that the bottom stays dry.
Helps keep floors dry
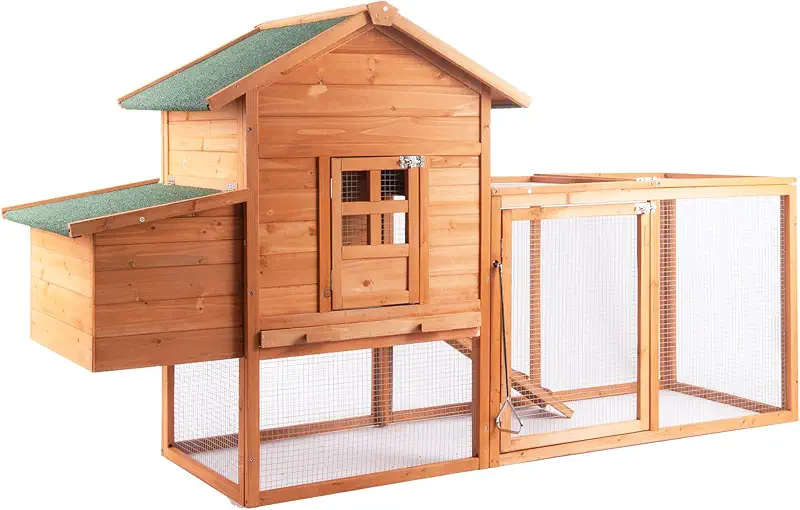
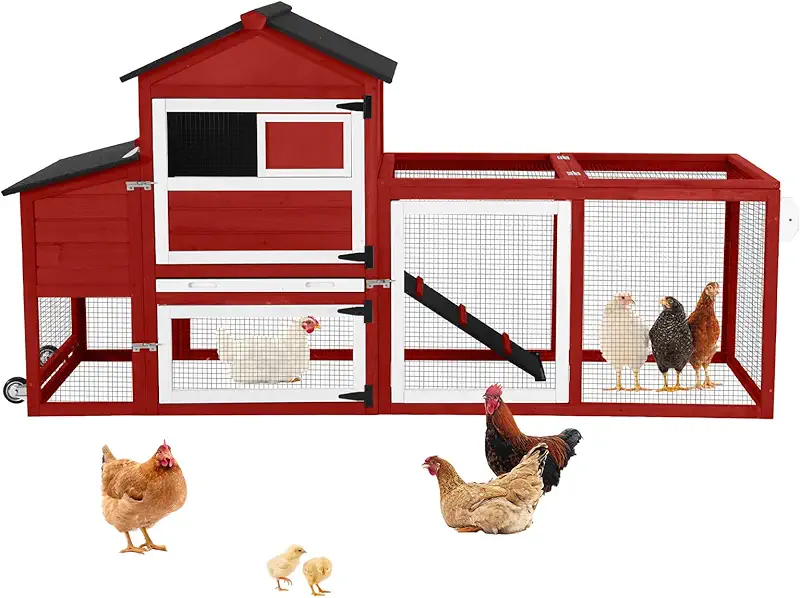
Larger coop with deep floor space
More surface for litter, better for those who like deep bedding and slower, calmer cleaning routines.
Roomy for more hens
How to protect a wooden chicken coop floor from moisture and dirt
Wood is kind to chicken feet, but it is not naturally strong against constant dampness and droppings. A good wooden chicken coop floor needs a little help. I like to think of it as giving the floor a raincoat and a soft blanket.
Layer 1: the “raincoat” – sealing the wood
The first layer is something that seals the wood. This can be:
- Exterior-grade paint, well dried before the hens move in.
- A non-toxic wood sealer, especially in corners and along edges.
- Waterproof tape or caulk along joints to keep liquids from seeping in.
When I paint a floor, I always do at least two coats and pay extra attention to the front edge where the door is. That is where damp boots and shovels often scrape, and where roost droppings sometimes land if birds sit near the entrance.
Layer 2: the “blanket” – litter on top
The second layer is the bedding you put over the wooden chicken coop floor. Over the years I have used straw, wood shavings, chopped hemp, and a mix of dried leaves and grass. Each has its character, but they all share one task: keeping the hens dry and the floor clean.
What matters more than the exact material is its depth and how often you stir it. I like to start with at least 5–7 cm for a small flock and go deeper if I use a “deep litter” style. Every few days I go in with a little rake or even just a gloved hand and turn the bedding, so fresh material comes to the top.
Gentle habit: I often do my quick floor check at dusk, just before the hens settle. A fast stir of the bedding and a sniff of the air tell me more than any complicated test. If it smells earthy and dry, I sleep peacefully. If it smells sharp or damp, I add fresh material the next day.
Layer 3: removable trays or liners
In some coops, especially smaller backyard models, the wooden chicken coop floor comes with removable plastic or metal trays that slide out. At first, I thought these were just a small luxury. Then I had a week with a bad back and realized how valuable they can be.
With trays, you can simply pull, empty, and refill without having to bend deep inside the coop. For older keepers or anyone with limited mobility, this can mean the difference between keeping chickens or giving them up.
If your coop does not include trays, you can still place a tough liner, such as a piece of pond liner or thick vinyl, on top of the wood. Just make sure it fits well and does not create hidden pockets where moisture can sit.
Daily and seasonal care for your wooden chicken coop floor
A good floor does not ask for much, but it does appreciate small, regular acts of care. Over time I have found a simple rhythm that keeps my wooden chicken coop floor in good shape without turning every weekend into a project.
My simple weekly routine
- Quickly check the corners for dampness or dark patches.
- Stir or rake the bedding, especially under the roosts.
- Remove any wet clumps from spilled water or broken eggs.
- Look for tiny gaps or cracks starting to open along the edges.
This small routine often takes less than ten minutes for a modest coop, but it prevents bigger problems. The hens also get used to me moving about quietly and trust me more.
Deeper cleaning sessions
A few times a year, I like to do a more thorough cleaning of the wooden chicken coop floor:
- Take out all the bedding and let the bare floor air for a while.
- Scrape any dried spots gently with a plastic scraper.
- Wipe the surface with a mild, safe cleaner and let it dry fully.
- Check the paint or sealer and touch up any worn places.
On those days I often sit on an upturned bucket inside the empty coop for a few minutes and just look around. It is easier to see small leaks, drafts, or awkward spots for the birds when the space is bare.
What my hens taught me about timing: I used to do big cleanings in the middle of the day, when I had free time. The hens would stomp around outside, complaining and waiting to go back in. Now I try to start late in the morning and finish before they are ready to lay or rest. It may sound small, but it keeps the whole flock calmer.
Checking a ready-made coop: wooden floor details to look for
If you are thinking about a new coop instead of building your own, it helps to know what to check in the photos and description. A nice picture from the front does not always show the truth of the floor.
My little checklist when I browse coops online
- Is the coop raised? I look for clear signs that the wooden chicken coop floor is off the ground, not sitting in mud.
- Are floors described as “removable” or “lined”? That tells me cleaning will be kinder on my body.
- Can I see the underside in a photo? I like to know how the weight is supported and if water can drain.
- Is there protection around the edges? Metal or plastic trims help stop water sneaking in.
- How big is the floor area per hen? Cramped floors get dirty faster and stress birds.
When I look through different wooden coops, I often open a few side by side and slowly compare these details. It feels a bit like choosing boots: you do not just look at the color; you think about where you will walk with them.
Quiet nudge: if you feel overwhelmed by all the choices, it can help to write three simple needs on a piece of paper. For example: “raised floor, easy to clean, enough room for 6 hens”. Then only look at coops that match those three. The rest can be ignored.
If you want to see different designs that match what we have talked about here, from small backyard setups to roomier homes, you can explore more wooden coop ideas.
I’ll quietly browse
Common mistakes with wooden chicken coop floors (and how to avoid them)
I have made more than my share of mistakes. Some were small and easy to fix; some took a whole weekend and a sore back to correct. Here are a few that I now try to help others avoid.
Mistake 1: too thin or weak floor boards
A floor that bends when you walk may feel harmless at first, but over time it can crack, warp, and trap dirt. Heavy hens landing from a roost put more pressure on the floor than we sometimes realize.
How to avoid it: choose floors that are made from boards or panels thick enough for people to stand on without flexing, and ideally supported by joists or beams underneath.
Mistake 2: ignoring the path of water
I once placed a coop near the bottom of a gentle slope, where water from the garden liked to travel after rain. The floor itself was fine, but the ground under and around it stayed damp for days. Even with a good wooden chicken coop floor, too much water nearby will find a way in.
How to avoid it: before setting a coop, watch where puddles form in your yard after rain. Put the coop on a slightly higher, firm spot, and use small trenches or gravel if needed to keep water away.
Mistake 3: not thinking about your own body
Some coop designs look pretty but make floor care hard on the keeper. A low door, a tiny opening, or a floor that you can reach only by crawling all lead to one result: we put off cleaning. And when we put off cleaning, the hens suffer first.
How to avoid it: when you look at any wooden coop, imagine yourself on a cold morning, tired and in a hurry. Can you still reach the floor easily, scrape under the roosts, and carry out a bucket of bedding without strain?
FAQ about wooden chicken coop floors
1. How thick should a wooden chicken coop floor be?
For most small to medium backyard coops, I like a wooden chicken coop floor that feels as strong as a small porch. In practice, this usually means at least 15–18 mm (around 5/8–3/4 inch) for plywood, supported by joists underneath.
If the coop has to carry children climbing in or big water containers, I prefer even stronger support. I press my heel into the floor: if it flexes, I treat that as a warning sign.
2. Will a wooden floor be too cold for my hens in winter?
In my experience, a well-built wooden chicken coop floor is kinder in winter than bare concrete or cold soil. Wood does not pull heat away as quickly, especially if the coop is raised and protected from wind underneath.
The real comfort comes from dry, deep bedding on top of the wood. If your hens can nestle their toes into a soft layer of shavings or straw, they will stay warm even when the air is chilly.
3. How often should I replace the wooden floor?
With good sealing, careful placement, and regular cleaning, a wooden chicken coop floor can last many years. I have one that is over a decade old, with only small touch-ups to paint and one replaced board near the door.
The key is early care: fix small scratches, seal any new gaps, and keep the floor as dry as you reasonably can. Waiting until boards are already soft or spongy makes the work much harder.
4. Is a wooden floor safe from predators like rats?
A solid, well-fitted wooden chicken coop floor is much safer than open dirt, but determined rodents can still chew through weak spots over time. I watch the corners, seams, and any place where light comes through.
On my coops, I sometimes add a layer of strong wire mesh under the wood or metal edges along the outside where chewing might start. Keeping the area clean of spilled feed also helps a lot.
5. What bedding works best on a wooden chicken coop floor?
My own flock has done well on soft wood shavings, sometimes mixed with a little straw. Shavings absorb well and feel gentle on feet. In damp seasons, I avoid very fine, dusty materials, as they can cling to moisture and bother the birds’ breathing.
Whatever you choose, make sure it stays dry and fluffy. A wooden floor covered with dry, sweet-smelling bedding is one of the nicest gifts you can give your hens.
A calm way to choose your wooden chicken coop floor
When you think about your wooden chicken coop floor, try not to rush or chase perfection. Your hens do not need a palace; they need a space that is dry, steady, and cared for with a kind hand.
If you are looking at ready-made coops, take your time. Read the details, study the photos, and picture your own flock walking in for the first time. Imagine the soft sounds they make when they settle on the roosts and scratch on the floor. If that picture feels peaceful, you are probably close to the right choice.
When you feel ready to explore some wooden coops that match these ideas—raised floors, kinder cleaning, and space for gentle routines—you can quietly look through different designs and see what calls to you.
I’ll take a slow look